How to Change Mouse Sensitivity Windows 11

How to Change Mouse Sensitivity Windows 11
Table of Contents
Mouse sensitivity is crucial when using your computer. If you’re using Windows 11, you may want to customize your mouse experience to suit your needs. You may need to adjust the sensitivity to improve accuracy during games or increase work efficiency. In this article, we will show you how to change mouse sensitivity in Windows 11 in multiple ways that will give you complete control over your experience with the mouse.
How to Change Mouse Sensitivity Windows 11
This article discusses how to adjust mouse sensitivity in Windows 11, allowing users to customize the user experience according to their preferences. The report provides clear and detailed steps to determine the level of mouse sensitivity efficiently and effectively. It begins by explaining the importance of changing mouse sensitivity and how it affects the user experience, whether you want to increase mouse accuracy for gaming or reduce sensitivity for precise tasks like graphic design.
Related: How to Restore Desktop Icons Windows 11
Why should I change mouse sensitivity?
Adjusting mouse sensitivity is a crucial task that may be necessary for various reasons, depending on the individual’s computer use and personal preferences. Below are some situations that may necessitate changing mouse sensitivity👇.
- Mouse accuracy in gaming: One may need to increase mouse sensitivity to achieve accurate and speedy responses. This is particularly important in first-person shooter (FPS) games, where optimal performance relies on precise control of mouse movements.
- Graphic work and design: For individuals engaged in graphic work or design, lowering the mouse sensitivity may be necessary to effectuate intricate movements and attain fine details in their projects.
- Everyday use and productivity: People may sometimes prefer lower mouse sensitivity in their daily productivity tasks, such as browsing online or managing documents. This can be convenient in avoiding massive movements and achieving precise control.
- Adapting to hardware: Changing the mouse sensitivity may be necessary to adjust to the new hardware’s performance when using a new computer or mouse.
- Personal comfort preferences: Personal comfort preferences are the primary reason for adjusting mouse sensitivity, as everyone feels comfortable with different levels of mouse sensitivity.
Change Mouse Sensitivity Windows 11
You are in the right place if you are looking for precise ways to adjust mouse sensitivity on Windows 11. You can customize this crucial item to improve your PC experience in the Mouse Sensitivity Control Panel. Whether you use your computer for video games or everyday work, here you’ll find simple steps to control how your mouse cursor interacts with your screen and adjust it entirely to your preferences.
First, go to search your computer. Then, search for the control panel. Then click Open.

After that, go to the control panel and click on the mouse.
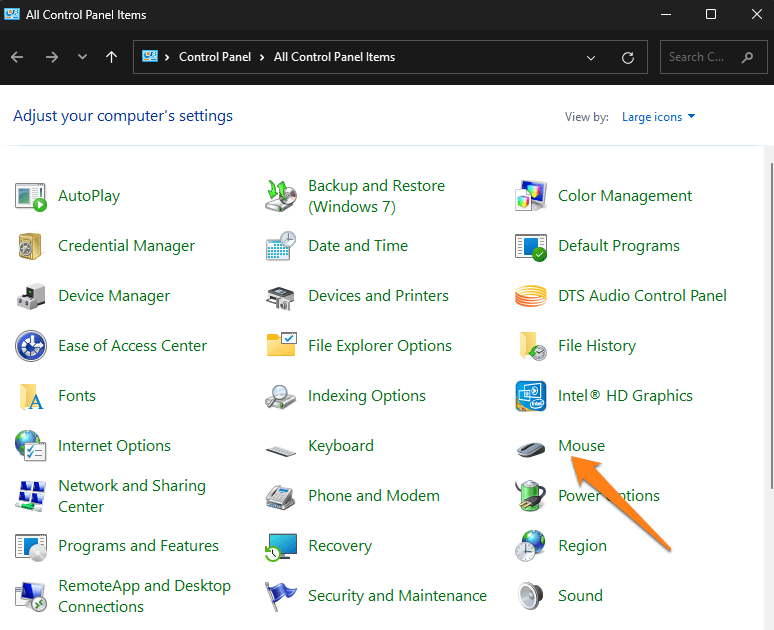
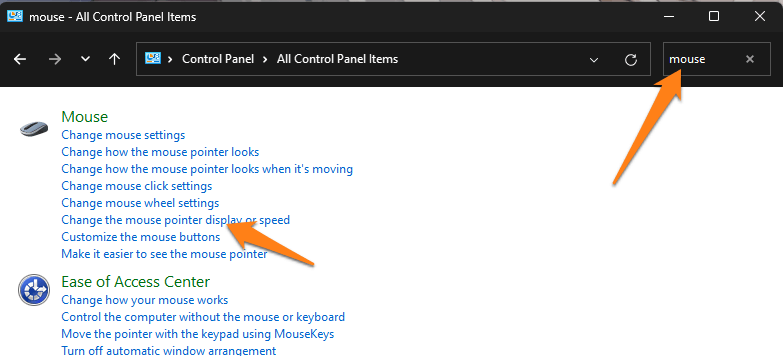
If you do not see it in this list, you can search for it in the search box at the top right of the screen in the control panel. Then click Change the width or speed of the mouse pointer.
A floating window will appear. Options. After that, you can control the speed of the mouse. After making your settings that are appropriate for you, click on Apply.
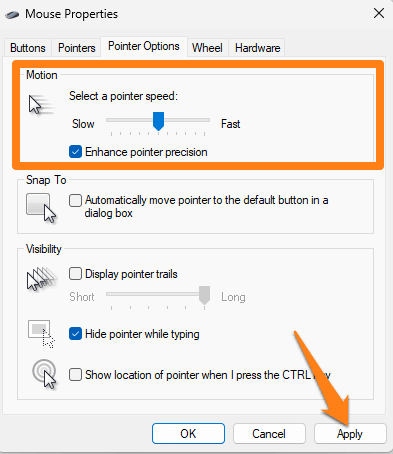
Now, you can easily control your mouse’s speed and set it as slow or fast as convenient.
Change mouse sensitivity settings
Adjusting mouse sensitivity settings is crucial to improve your interaction with your computer. In this section, we will guide you on how to change mouse sensitivity settings in Windows 11 efficiently and with ease. You will learn to increase or decrease the pointer speed and fine-tune it to match your usage style.
First, go to your computer settings.

After opening Settings, go to Bluetooth & Device. Then click on the mouse.
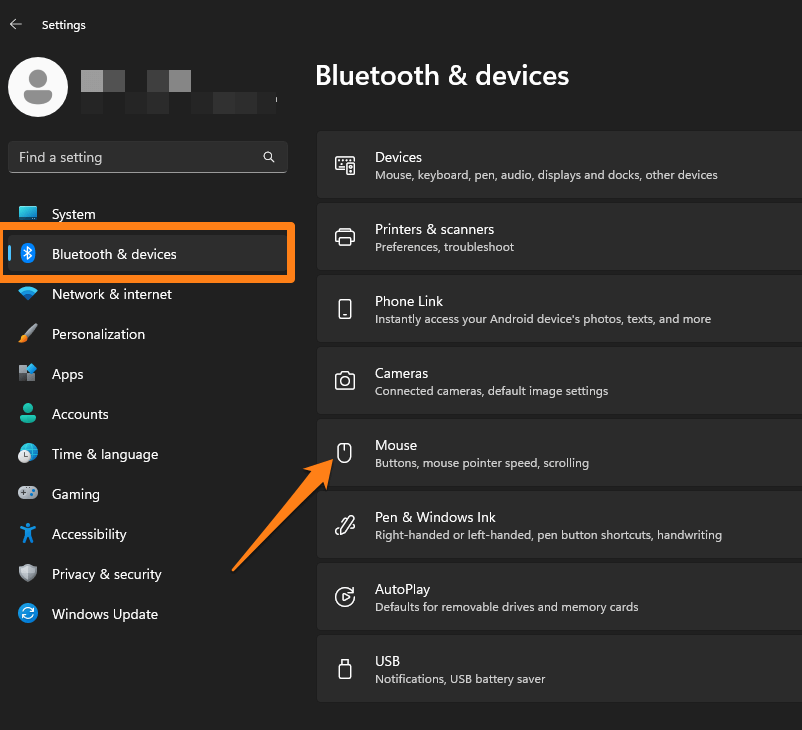
Now, you will be taken to the mouse settings page. At the top right of the screen, you can determine the mouse speed by dragging the control swipe.
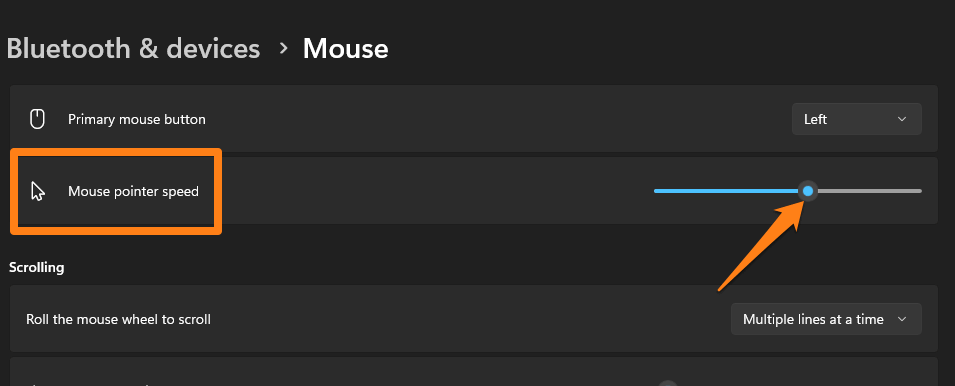
Please be informed that you can now regulate your mouse’s speed to suit your preferences and specific needs. This feature can be helpful, especially if you are experiencing issues with background programs while using the mouse. Hence, depending on your comfort level and the task, you can adjust the speed to a faster or slower rate. You can review the previous article to learn how to turn it off and enjoy playing without interruption on your computer.
conclusion
Mouse sensitivity settings can be the difference that can make a huge difference in your computer experience. When you learn how to customize and adapt these settings to your individual needs, you’ll be able to enjoy better performance in games and business.
You can change mouse sensitivity with Windows 11 and its intuitive control panel. Some people may be surprised by the significant impact that these simple steps can have on their performance. Feel free to experiment with different settings until you find what works best.
We hope this article has provided a helpful guide to adjusting mouse sensitivity on Windows 11. Enjoy the experience of using your PC to its maximum capabilities and personal preferences, and always feel free to consult this guide if the need arises to adjust further.


