How to Fix Programs Not Installing on Windows 11
How to Fix Programs Not Installing on Windows 11
Table of Contents
Microsoft’s release of Windows 11 has brought forth a new and improved computing experience for users. However, encountering technical challenges during software installation is inevitable. Therefore, it is crucial to grasp how to navigate such challenges to ensure your computer’s seamless and efficient performance. In this article, we delve into a solution to the common issue of failed software installation on Windows 11. We provide valuable guidance to aid in streamlining the software installation process and ensure a successful outcome on this system.
How to Fix Programs Not Installing on Windows 11
Successfully installing software is vital for a reliable and smooth user experience on your computer. In this article, we’ll explore the issue of software not installing on Windows 11 and provide practical tips to overcome this obstacle. Let’s delve deeper into the causes and discover specific steps to make the software installation process more accessible and successful.
Run The Installer As Administrator
When attempting to resolve the issue of programs failing to install on Windows 11, executing the installer file as an administrator is recommended. This action grants the program complete access to the essential system components and files required for a successful installation. This process is a vital component of the solution to overcome installation complications and guarantee a seamless execution of software on Windows 11.
Right-click on the installation file and then click Run as administrator.

Always remember that running the installer file as an administrator on Windows 11 is crucial to successful software installation. Doing so saves valuable time and effort and ensures that programs run seamlessly on your computer. Rest assured that this is just one of the many steps you can take towards resolving any issues with Windows 11 software installation, which we’ll explore in greater detail in the following sections of this article.
Run The Software Installation Troubleshooter
This part will delve into the Software Installation Debugging Tool, its practical usage, and its capabilities in analyzing and resolving software installation issues on Windows 11. We will emphasize the steps needed to implement the tool and explain how the user can utilize it to overcome the challenges faced while installing the software.
First, download the Software Installation Troubleshooter on your computer and run it.

After running the program, click Next.

Choose Installing, and the tool will start automatically scanning for any issues with registry files.

Then click on the program you are trying to install. If you can’t find it in the list, click Not Listed, then click Next.

Then, follow the on-screen instructions to complete the troubleshooting process. After completing this process, try installing the program again.
With the troubleshooting process complete with the dedicated tool, you are set to try installing the software again. This step will help you overcome any obstacles you may have encountered and enable you to unlock the full potential of the app or software you install on Windows 11.
Enable Developer Mode
Enabling Developer Mode is necessary for users exploring modern operating systems’ programming and application development frontiers. Windows 11, for instance, offers abundant possibilities and customizations when developer mode is activated, which helps you create or test other apps. This section will delve into the technical details of what Developer Mode entails and how to enable it on Windows 11.
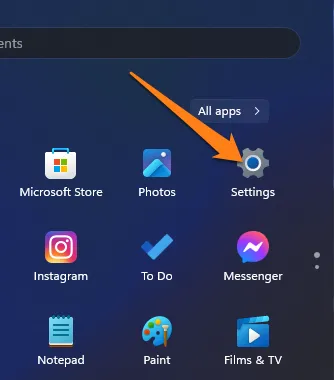
Go to Settings on Windows 11.

After going to Settings, click on Privacy and Security at the bottom right of the screen.

Then click on For Developers.

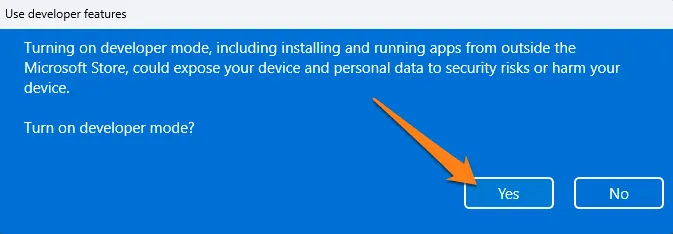
Now activate the Developer Mode button to run it.

Then click on Yes.
Enabling Developer Mode on Windows 11 is a crucial step for software developers and users who seek to delve into the system’s advanced features and capabilities. It presents an opportunity for experimentation, learning, and development, opening doors to explore the world of programming and innovation. Upon enabling Developer Mode, users can leverage the most extensive range of app customization and development on Windows 11, offering many possibilities to explore and create.

What is Developer Mode?
Enabling the Developer mode in Windows 11 provides several benefits for app development. Firstly, it allows you to install and run unsigned applications without issues. Additionally, you can use Hyper-V to create virtual machines to test various applications and environments. This mode also grants access to the Windows Subsystem for Linux (WSL), which enables the installation and use of the Linux operating system to develop Linux-compatible applications. Furthermore, it provides access to the Windows Development Center, which offers additional tools and resources to help you build applications and understand and test Windows features. Finally, enabling Developer mode lets you turn off other security features that may hinder app development.
Uninstall The Previous Version Of the Program
When updating to Windows 11 or attempting to install a new version of a program, the installation process may not always be successful. In such instances, pre-existing software versions may create difficulties or complications. Thus, it is essential to remove older versions of the program. In this context, we will explore drawing outdated software versions of Windows 11.
First, find Control Panel, then click Open.

Then click on Programs and Features.

Select the program you want to remove and click Uninstall/Change above.

This is all; after uninstalling the program, install it again, and it will be installed.
Eliminating past software versions of Windows 11 is a crucial measure to guarantee a stable and efficient installation. This process prevents version conflicts and enhances the user’s experience and performance of the novel software. By adhering to the correct procedures to eliminate previous versions, you will be ready to install the new software successfully and derive maximum benefits from it on Windows 11.
Check The Settings For Installing Apps
As the technology landscape continues to evolve and with the introduction of the new Windows 11 operating system, it has become increasingly important to exercise caution when installing apps on our devices. One crucial aspect to consider is the app installation settings, which dictate the methods by which apps and their sources are installed on the system.
In this context, we will delve into how to review and verify application installation settings on Windows 11. We will cover the essential locations that require careful consideration to ensure that apps are installed safely and securely.
First, go to settings.
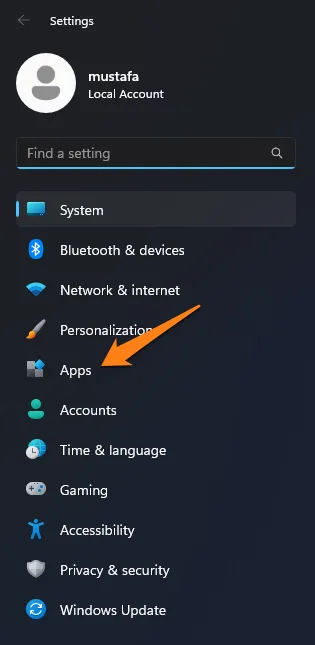
After going to Settings, click on Apps.
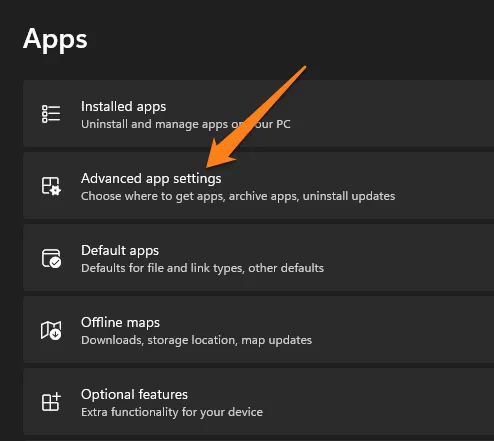
Now click on advanced app settings.
After that, click anywhere on the right of the screen to change the option.
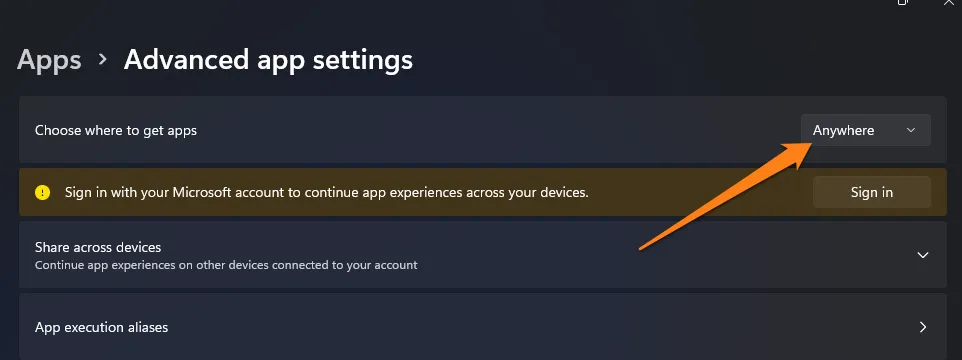
Then select Anywhere, but let me know if there’s a comparable app in the Microsoft Store.
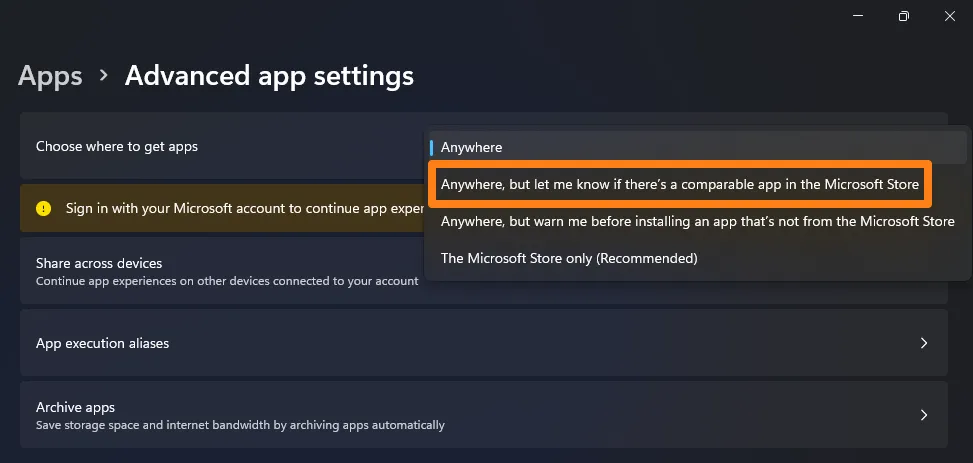
The installation settings for applications in Windows 11 vary from basic to granular, and they are crucial for enhancing user experience and maintaining system security. By carefully scrutinizing and assessing these settings, you can ensure that applications are installed successfully and attain optimal software performance on Windows 11. After choosing the option, go to the program you want to install and then install it.
Check Software Compatibility
During the process of upgrading to Windows 11, it is possible to encounter compatibility issues as a result of installation failures. Despite the smooth performance of specific programs and games on Windows 10, their compatibility with Windows 11 cannot be guaranteed. As a consequence, users may face difficulties during the installation process. It is worth noting that application providers’ websites are a valuable source of information regarding the compatibility of specific apps.
Ensuring software compatibility with Windows 11 is crucial for successfully installing and efficiently utilizing the new system. It is essential to consider the potential software installation and compatibility challenges, which can adversely affect system performance. Conducting a preliminary review of compatibility information and verifying software compatibility before installation can save valuable time and avoid future complications. This proactive approach will enable you to optimize your system’s performance and ensure smooth, uninterrupted workflow.
Update Windows
You should keep your Windows operating system up-to-date with the latest available versions. Regularly updating your system ensures your computer’s security and optimal performance. Continuous updates to the operating system help address and resolve security vulnerabilities while enhancing overall functionality and performance. With the recent release of Windows 11, keeping your system up-to-date has become even more significant.
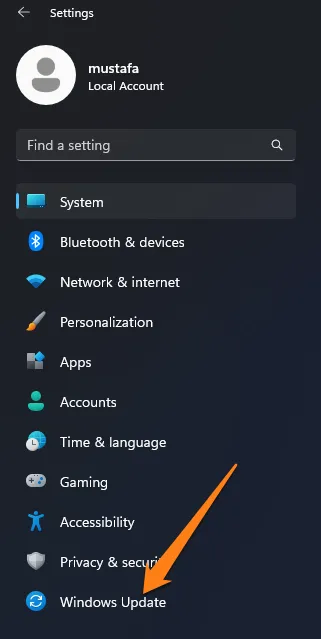
First, Open Settings on Windows 11.

After that, click on Windows Update at the bottom left of the screen.
After that, click Check for updates at the top right of the screen.
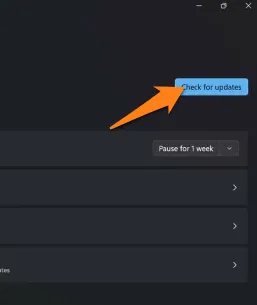
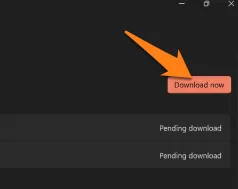
Then, wait a little while; if an update is available, click Download Now.
Ensuring your Windows 11 operating system is up-to-date is crucial for optimal performance and security. To achieve this, it is recommended to regularly check for system updates using the appropriate steps outlined above.
Once the update is finished installing, restart your computer and try reinstalling the software.
Conclusion
We conclude that Windows 11 offers many opportunities to explore and utilize various programs and applications. However, installing software may present challenges that can disrupt your experience. Failing to install software not only causes inconvenience but also hinders productivity. Fortunately, by implementing the solutions and tips outlined in this article, you can surmount this issue and guarantee a successful installation of programs on Windows 11.